
How to Accurately Track Your Facebook Ad Metrics in 2022

Do your Facebook ads seem to be underperforming? Wondering how to reliably track and analyze campaign performance?
In this article, you'll discover 11 steps to setting up an accurate reporting system for your Facebook advertising in 2022, despite privacy restrictions.
Why Accurate Reporting for Facebook Ads Is More Difficult
As most advertisers know, the release of the iOS 14 user privacy updates in 2021 made it more difficult to track user behavior on iOS devices and has a significant impact on ad platforms like Facebook. Now Google has announced that over the next two years, it will begin offering improved privacy options for Android users, which will further impact the amount of data Facebook can collect.
In light of these privacy changes, there are steps you can take set up accurate reporting systems for Facebook ads. Using the platform's newly released best practices as a guide, we'll cover everything from account setup to campaign optimization to data analysis.
#1: Verify Your Domains
If you haven't yet verified the domain where your Facebook ads drive traffic, this is a critical first step. Why is domain verification so important? It confirms that your business owns the site where you want to measure conversions. It can also affect your ability to prioritize conversion events (see below), which can have a huge impact on ad delivery and reporting.
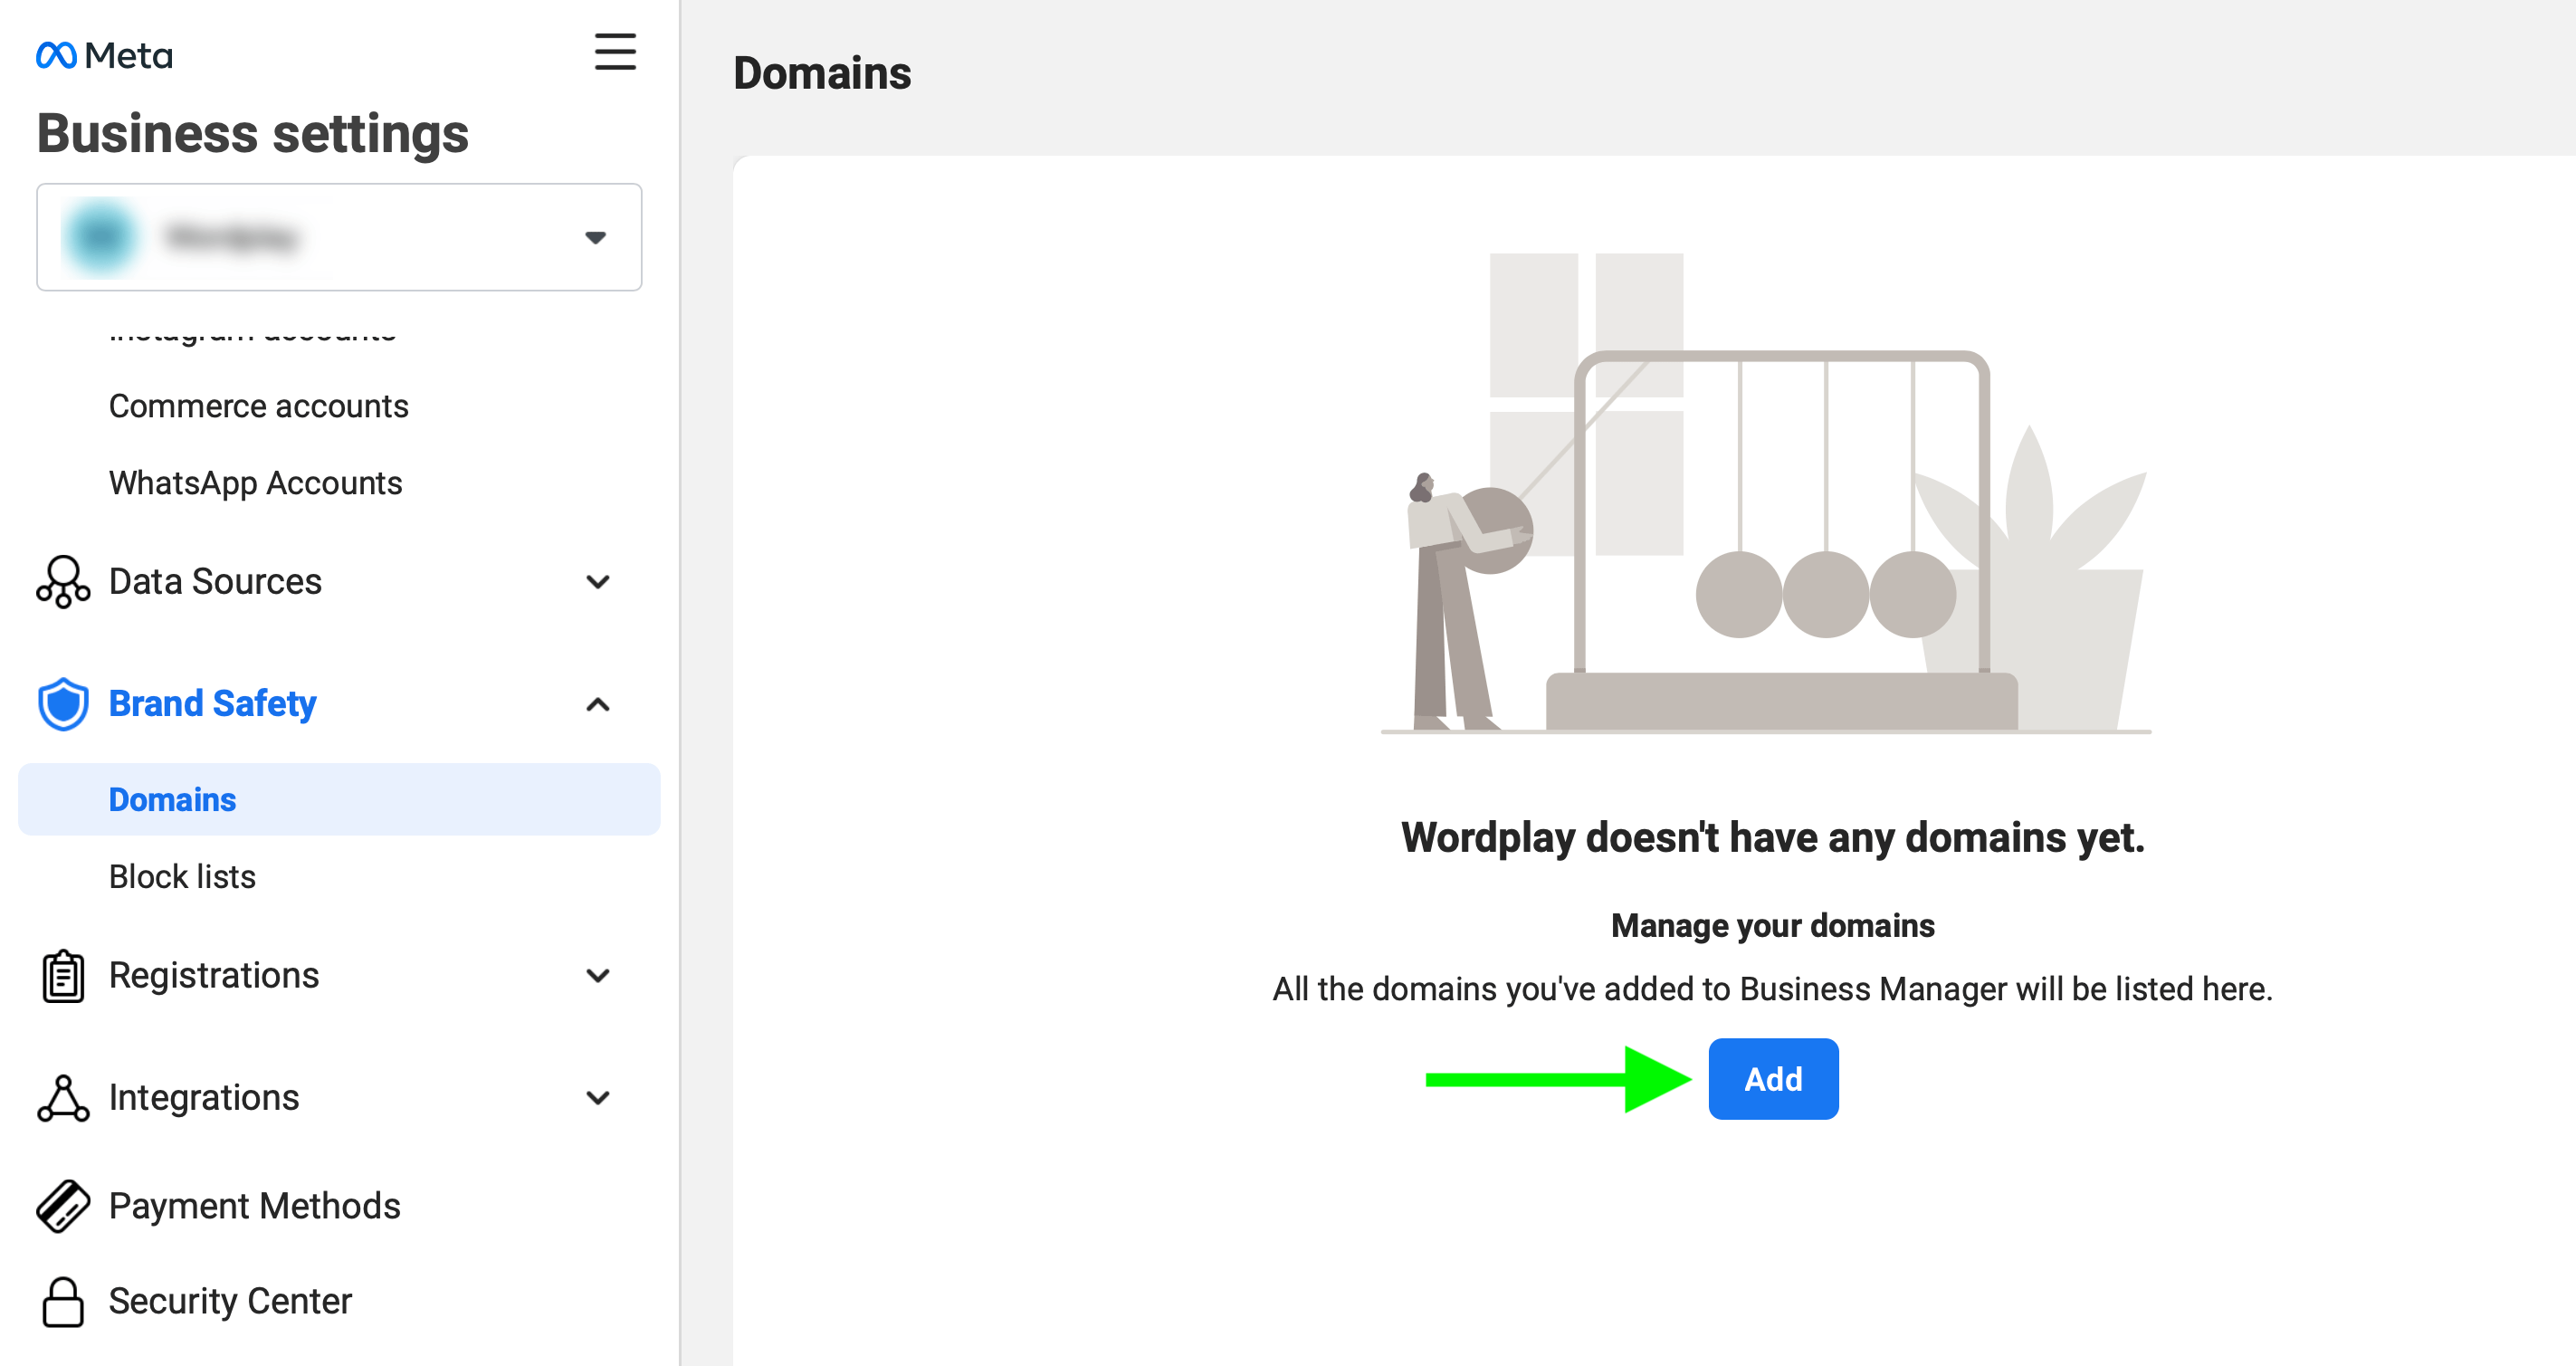
Fortunately, domain verification only takes a few minutes, as long as you or a developer has access to the back end of your website. Start by opening your Business Manager and clicking the gear icon to go to Business Settings. Then open the Brand Safety drop-down menu. Select Domains and click the blue Add button to verify a new domain.
Once you enter the root domain of your site, Business Manager automatically generates a unique meta-tag. Follow the instructions to add the meta-tag to your website. Until you complete the process, the domain will show a red Not Verified status.
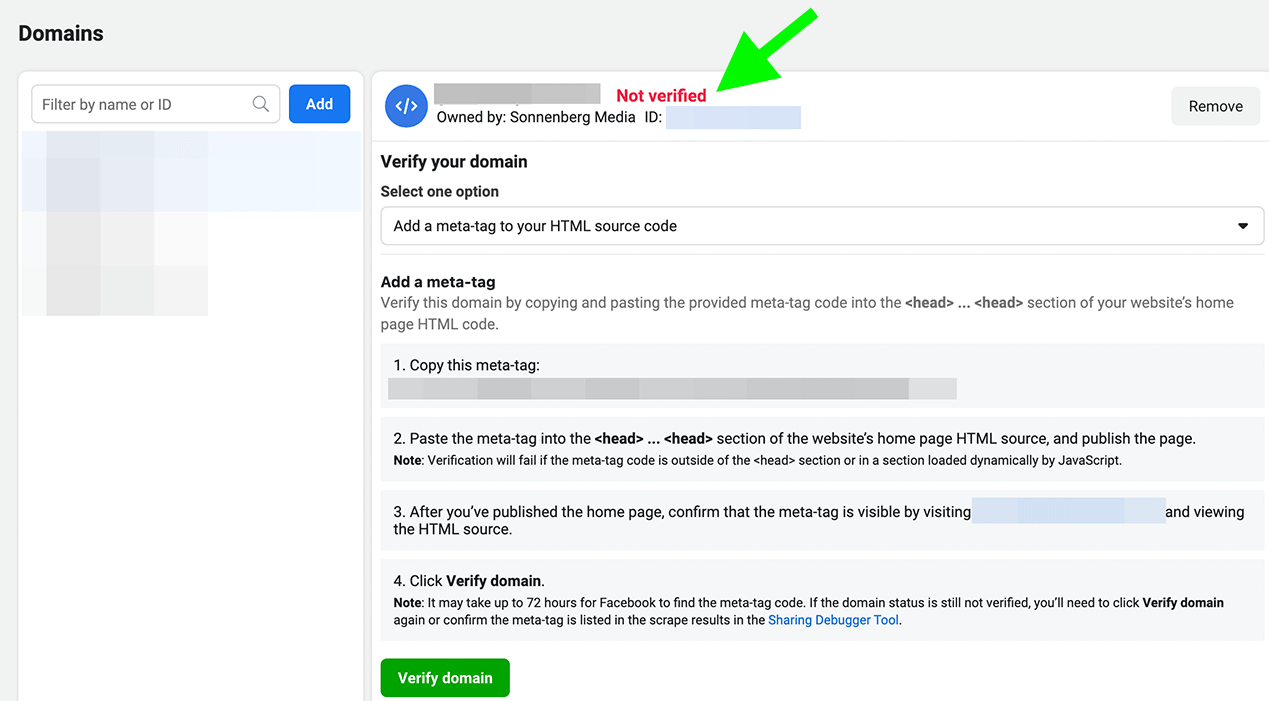
After you add the meta-tag to the site, go back to the Domains tab in Business Settings and click the green Verify Domain button. The domain should now show a green Verified status.
If your site has multiple subdomains that generate leads, sales, or other conversions, you don't need to verify them. In fact, you can only verify the root domain. But if your site has more than one suffix—for example, to accommodate customers in different countries—then you do need to verify each domain separately.
#2: Configure Conversion Events
Like domain verifications, conversion events are essential for accurate measurement and reporting. They're especially important if you run campaigns designed to drive actions on your website. They're critical if you want to reach customers with iOS devices, due to Apple's App Tracking Transparency framework.
As of November 2021, over 60% of eligible iOS users have opted out of third-party app tracking. That means you can't reach these users with Facebook ads or accurately report on their conversions unless you configure and prioritize conversion events.
How do conversion events work? Every domain can have up to eight conversions including standard events and custom conversions. Whether you want your audience to make a purchase, add an item to a cart, submit a lead form, or view content on your site, you first have to configure the conversion in Facebook Events Manager.
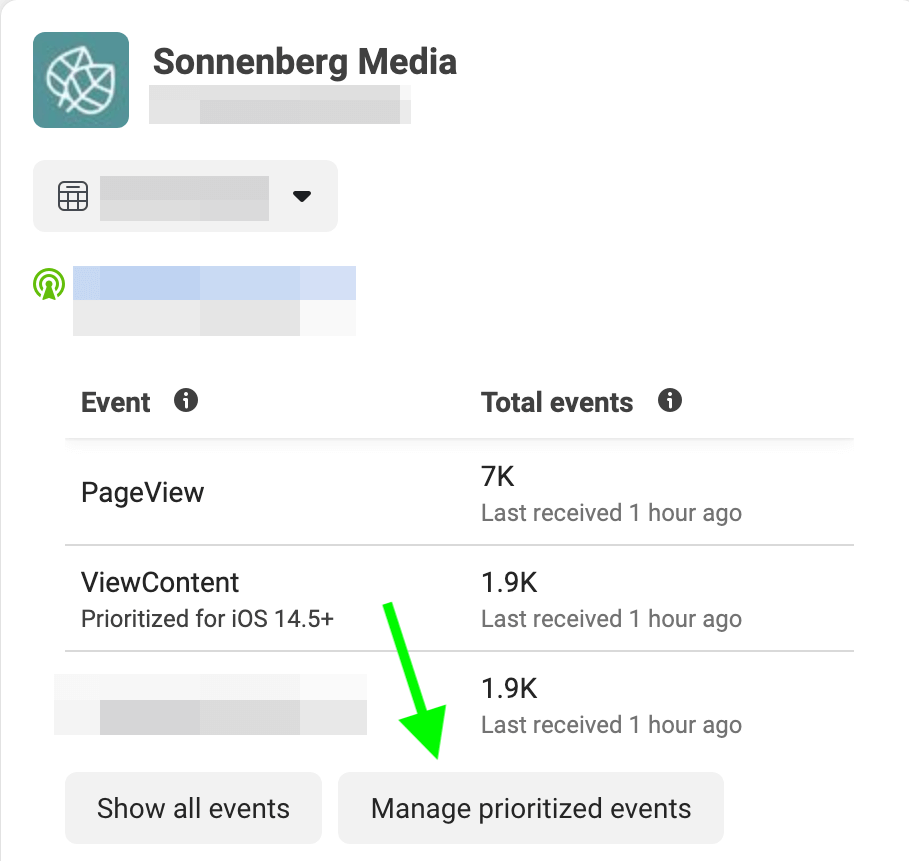
Start by opening Events Manager, locating your pixel on the Overview tab, and clicking the Manage Prioritized Events button. Then use the drop-down menus to add the eight conversions you want to track based on the marketing goals you want to achieve. If you want to track a value-optimized event like purchases, you'll need to allot at least four of the eight available slots.
When you're finished adding conversion events, drag and drop them in order of priority. At the top of the list, place the most important event or end goal like purchases or leads. Note that Ads Manager only reports one conversion per person per conversion window, starting with the highest-priority event. If the event that matters most to you isn't top priority, then it won't be tracked if the person completes the less-important event that is top priority.
Transform Your Strategy with World-Class Training
Want the best training and insights to take on anything—without leaving the comfort of your home or office?
The On-Demand ticket for Social Media Marketing World 2022 gives you access to recordings of every keynote, session, and workshop from the event for an entire year. But hurry, the offer ends soon, then they're gone forever.
GET THE TRAINING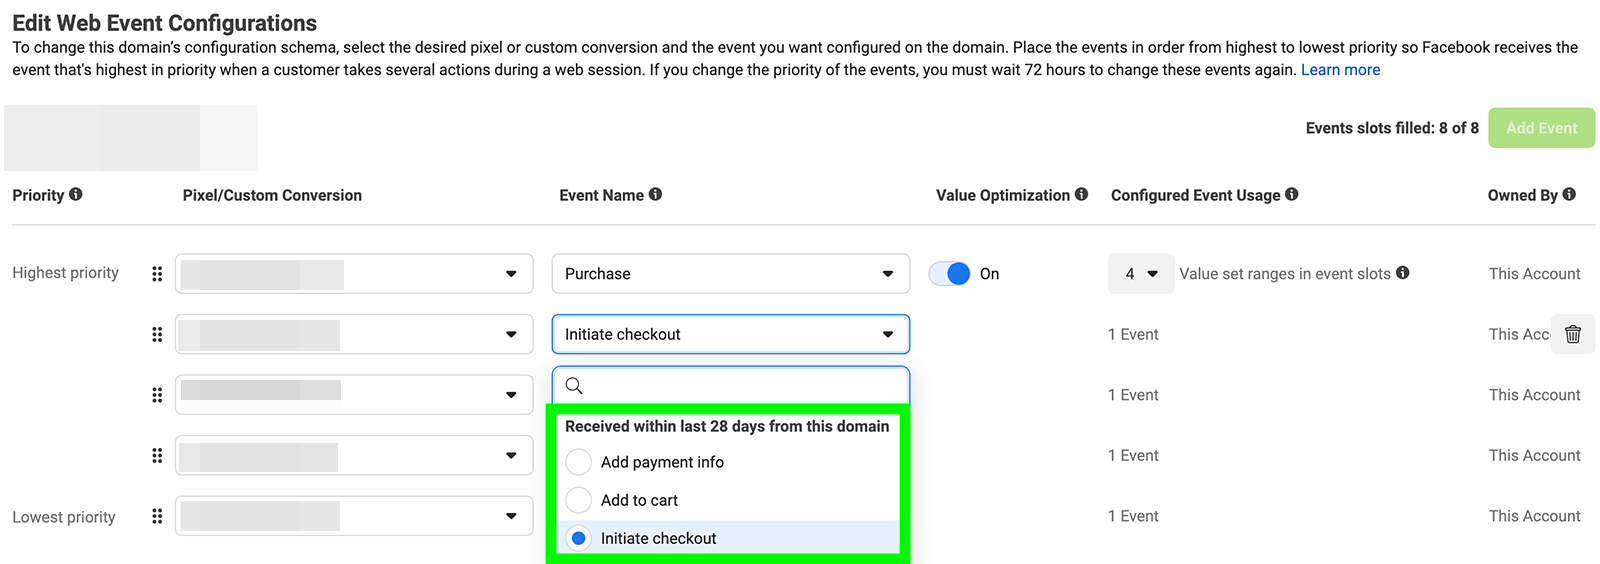
While you only need to verify domains once, you may need to configure or update conversion events periodically. That's because your conversion events should align with your organization's marketing goals and campaign objectives, which may change over time.
#3: Choose the Right Optimization Event
Now that you've configured conversion events, you can optimize for them in relevant campaigns. When you choose a conversion event for an ad set, you effectively tell Meta how to optimize ad delivery to help your campaign succeed.
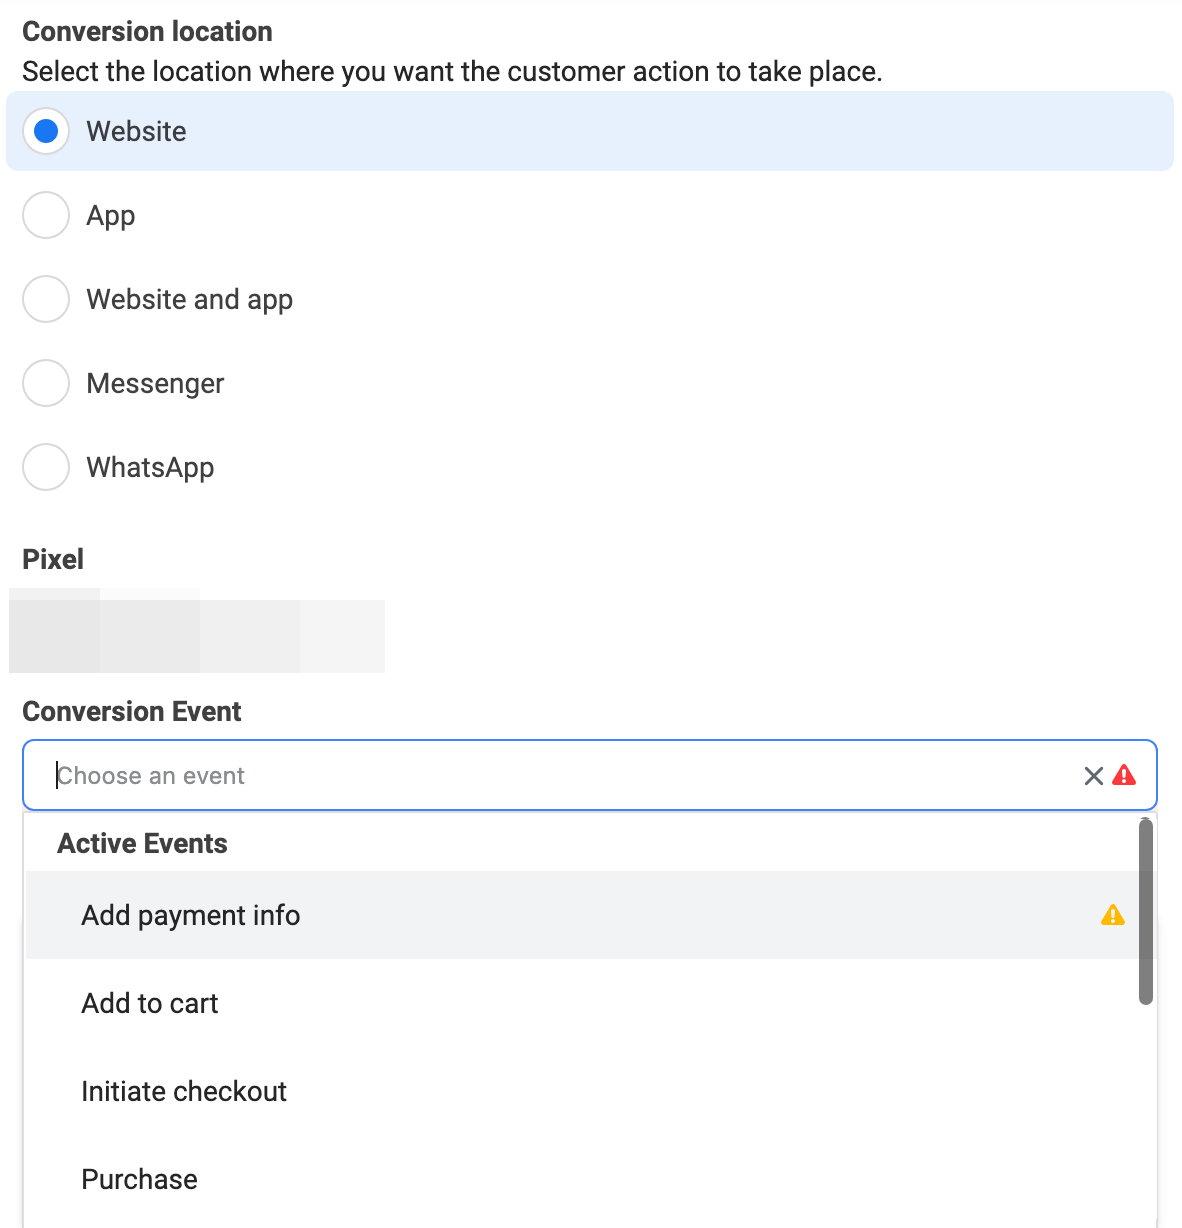
To select a conversion event, choose a campaign objective that drives results on your website such as leads or sales. At the ad set level, select Website as the conversion location and then choose the conversion you want to target.
In addition to the eight conversions you prioritized in Events Manager, you also have the option to select a non-prioritized event. Keep in mind that choosing a non-prioritized event means Meta can't deliver your ads to iOS users who've opted out of app tracking.
If all of your customers are Android or desktop device users, you may not need to worry about iOS tracking. But in most cases, optimizing for a non-prioritized event will cause your campaign results to suffer and your reporting accuracy to be low. To improve both of these factors, optimize the ad set for a prioritized event; ideally, one that's at the top of your list.
#4: Rethink the Campaign Objective
To optimize ad delivery and results, it's also important to choose the right campaign objective. If your Ads Manager has updated to Outcome-Driven Ad Experiences (ODAX), then you may need to rethink your campaign setup to improve reporting and results.
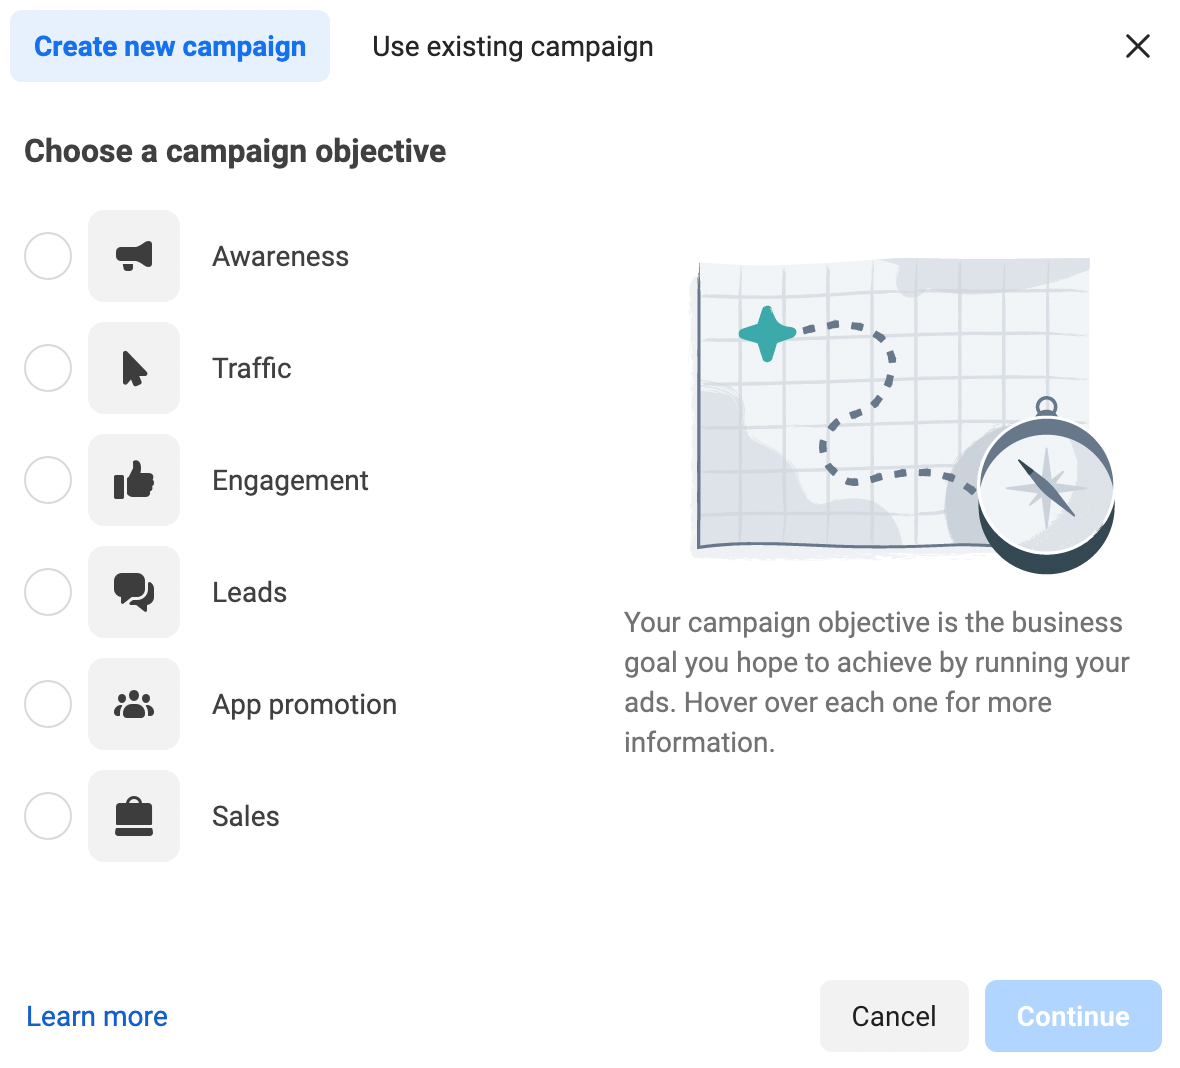
Instead of the 11 objectives available with the former version of Ads Manager, the updated version offers six consolidated objectives. Although the new awareness, traffic, engagement, and app promotion objectives remain similar to their counterparts from the previous version of Ads Manager, others didn't translate as directly.
For example, ODAX doesn't support the conversions objective. Instead, you'll want to use engagement for upper-funnel conversions like viewing content or subscribing. For mid- or lower-funnel conversions, it's best to choose an objective like leads or sales.
Because ODAX doesn't support the messages objective either, it's important to structure your campaign based on the business goal you want to achieve. For example, engagement can help you start new conversations with top-of-funnel prospects, while sales is ideal for driving revenue through messaging.
#5: Review the Conversion Window
Setting the correct conversion window for your Facebook ads is critical for attributing results accurately. If you choose an objective that drives actions on your website, Ads Manager defaults to the 7-day click or 1-day view attribution setting. If your customers typically convert in a shorter window, you can choose 1-day click or view at the ad set level instead.
If you choose the app promotion objective, Meta recommends using a 24-hour conversion window. If your customers generally take longer to convert, you have the option to set a longer window. But using a longer timeframe may mean you lose out on optimization opportunities, which could compromise campaign results.
Is Web 3.0 on Your Radar?

If not, it should be. This IS the new frontier for marketing AND business.
Tune into the Crypto Business podcast with Michael Stelzner to discover how to use Web 3.0 to grow your business in ways you never thought possible—without the confusing jargon. You'll learn about using NFTs, social tokens, decentralized autonomous organizations (DAOs), and more.
FOLLOW THE SHOW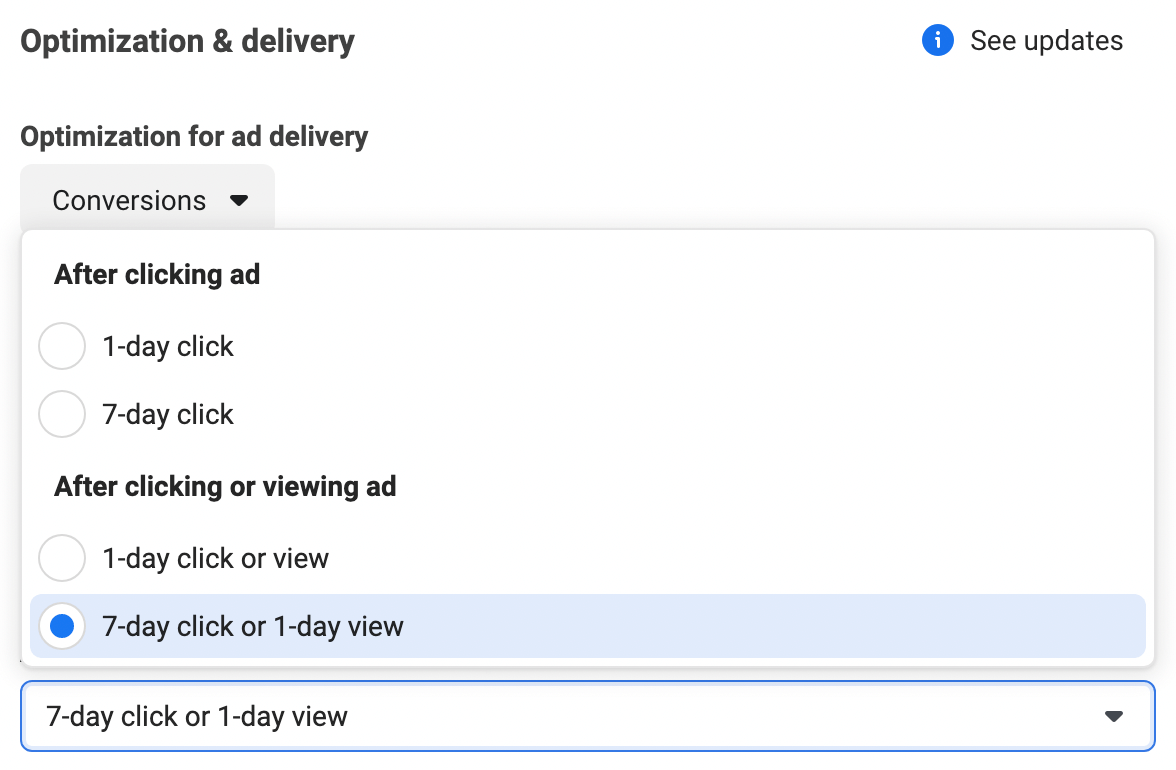
#6: Switch to Broad Targeting
Whether you want to drive results in your app, on your website, or on Facebook or Instagram, there's never been a better time to rethink your audience targeting. In addition to iOS-related targeting limitations, Meta made substantial changes to detailed targeting options in January 2022.
If your existing ad sets include one of the countless underused or sensitive audience segments that Meta has since removed, you've probably received a notification from Ads Manager prompting you to update your targeting selections before the March 17, 2022 deadline.

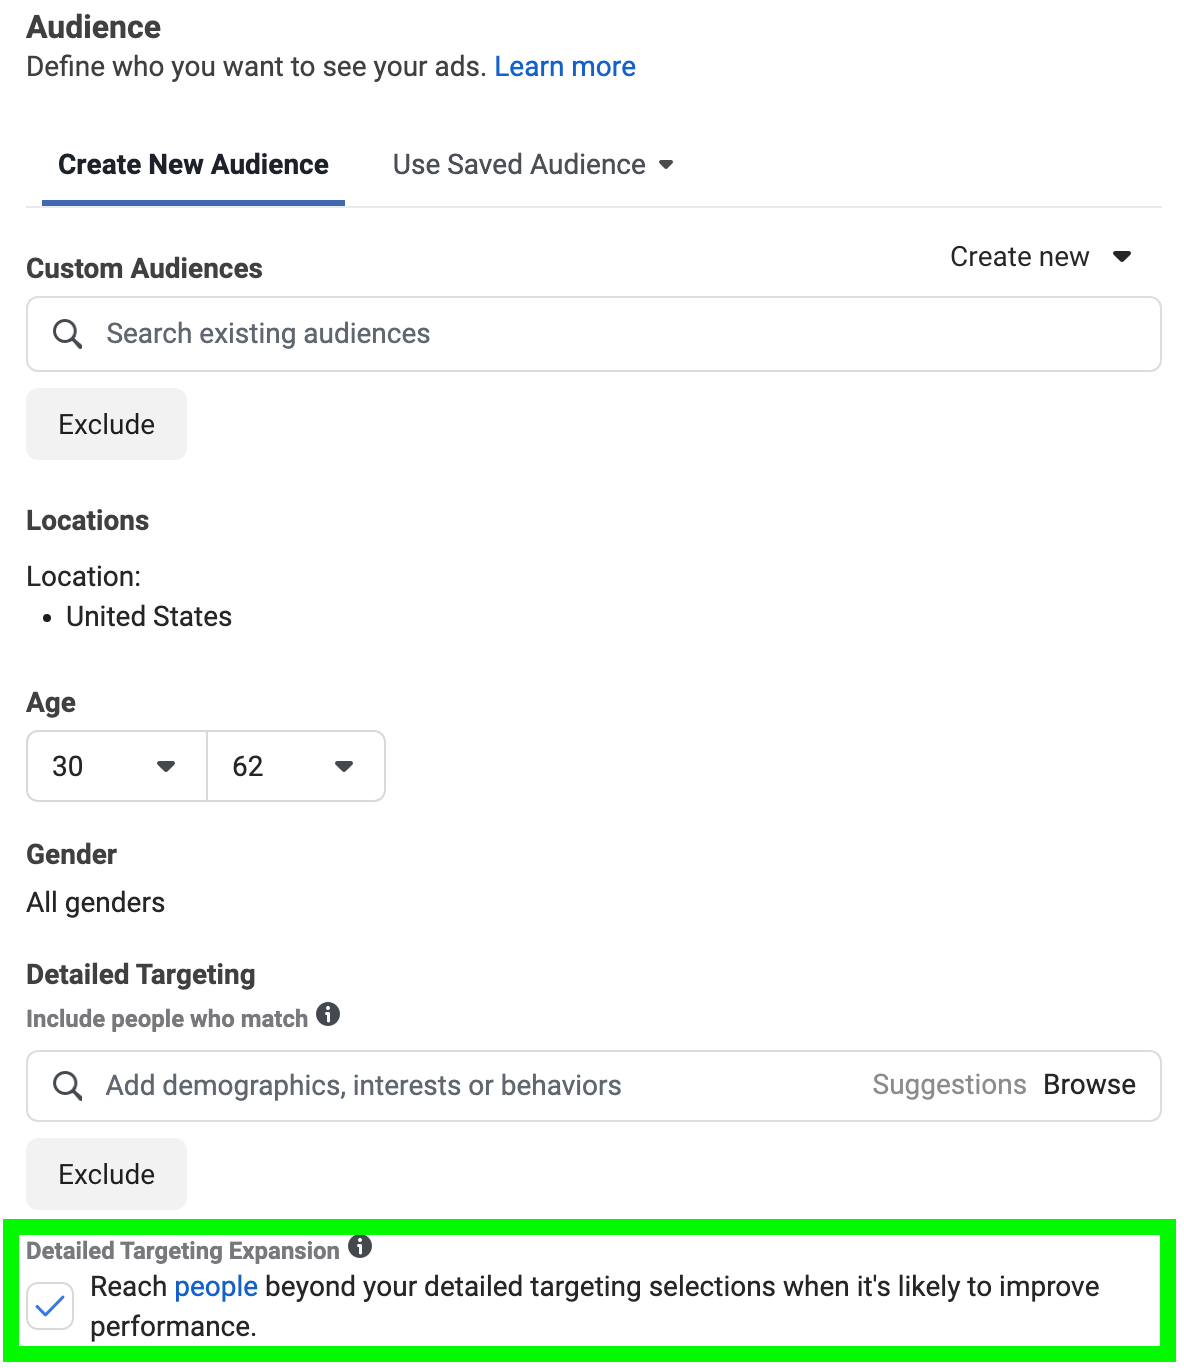
But even if you don't have any affected ad sets, it's a good idea to take Meta's targeting recommendations seriously the next time you create a campaign. Whenever possible, Meta now recommends using broad targeting and detailed targeting expansion for your ad sets.
- Broad targeting depends on basic demographic settings, with no interest-based targeting whatsoever. To use broad targeting, create an audience that uses age, gender, and/or location settings only.
- Detailed targeting expansion allows Meta to deliver your ads beyond the audience you've built, as long as it's likely to drive results. To use detailed targeting expansion, check the box at the ad set level.
It may seem counterintuitive to use these targeting options, especially if you want to reach a more specific audience. Yet Meta has clarified that these options are better for optimizing ad delivery, which can improve campaign performance and drive more of the results you want.
#7: Maximize Ad Placements
In addition to targeting a wider audience, consider using more of the available placements in Ads Manager. If your business has historically gotten great results from Instagram Explore or Facebook Groups, for example, then you may be tempted to focus on those placements.
However, Meta can optimize ad delivery more easily when there are more placement options to choose from. That means using as many placements as possible can allow more efficient delivery and more cost-effective results.
To allow all possible placements, choose Automatic Placements at the ad set level. Alternatively, choose Manual Placements and select as many as possible. Meta recommends choosing at least six placements.
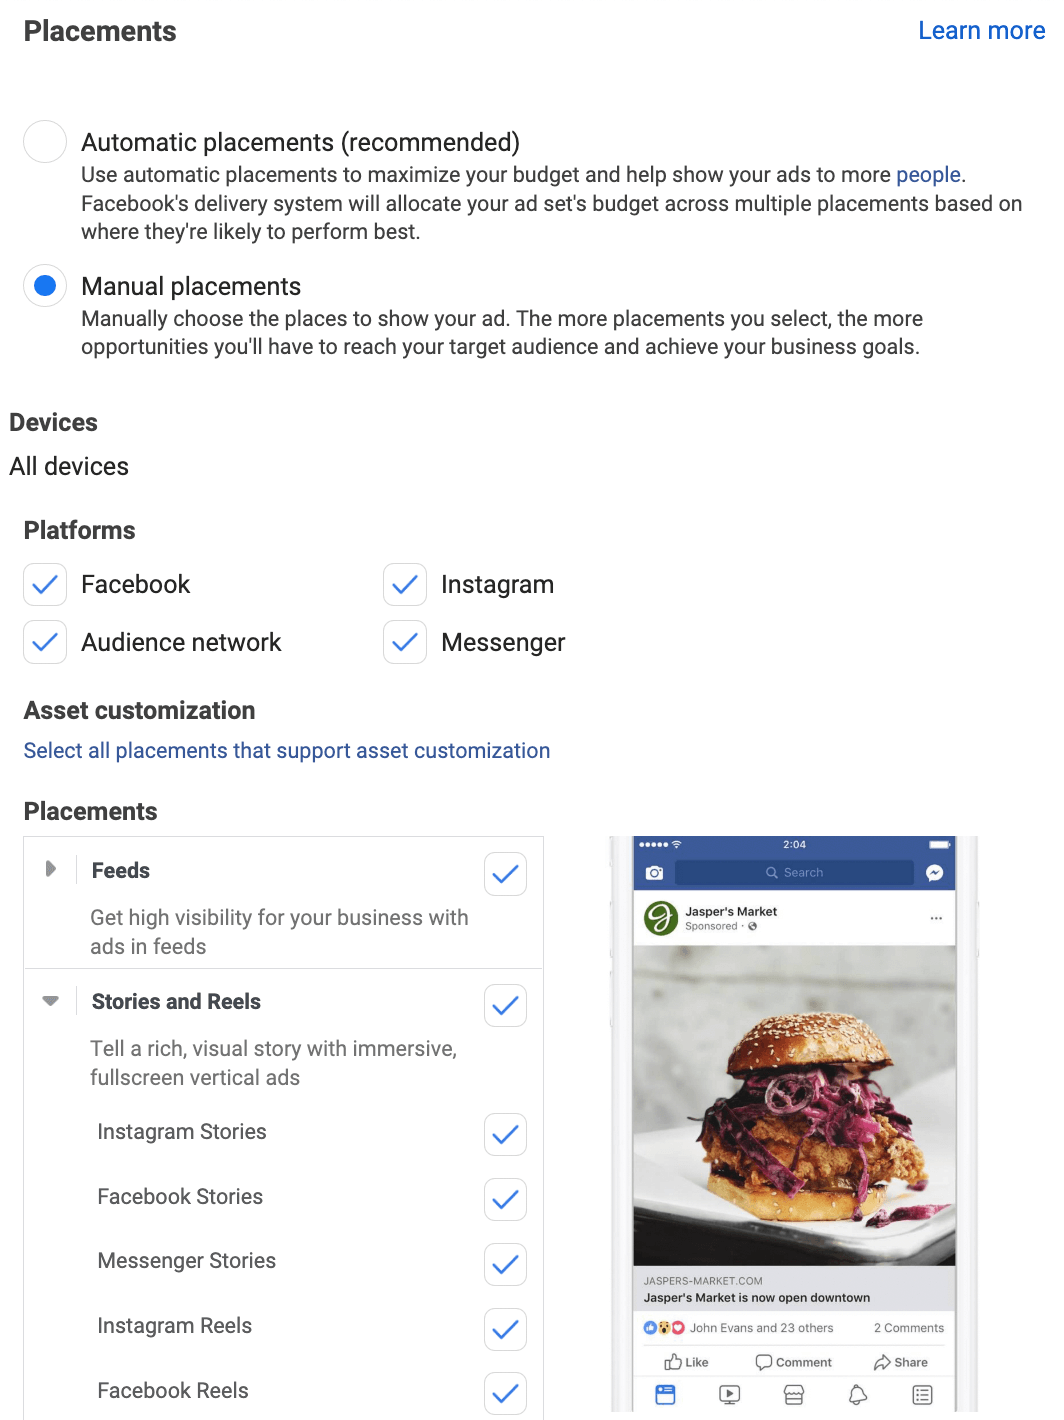
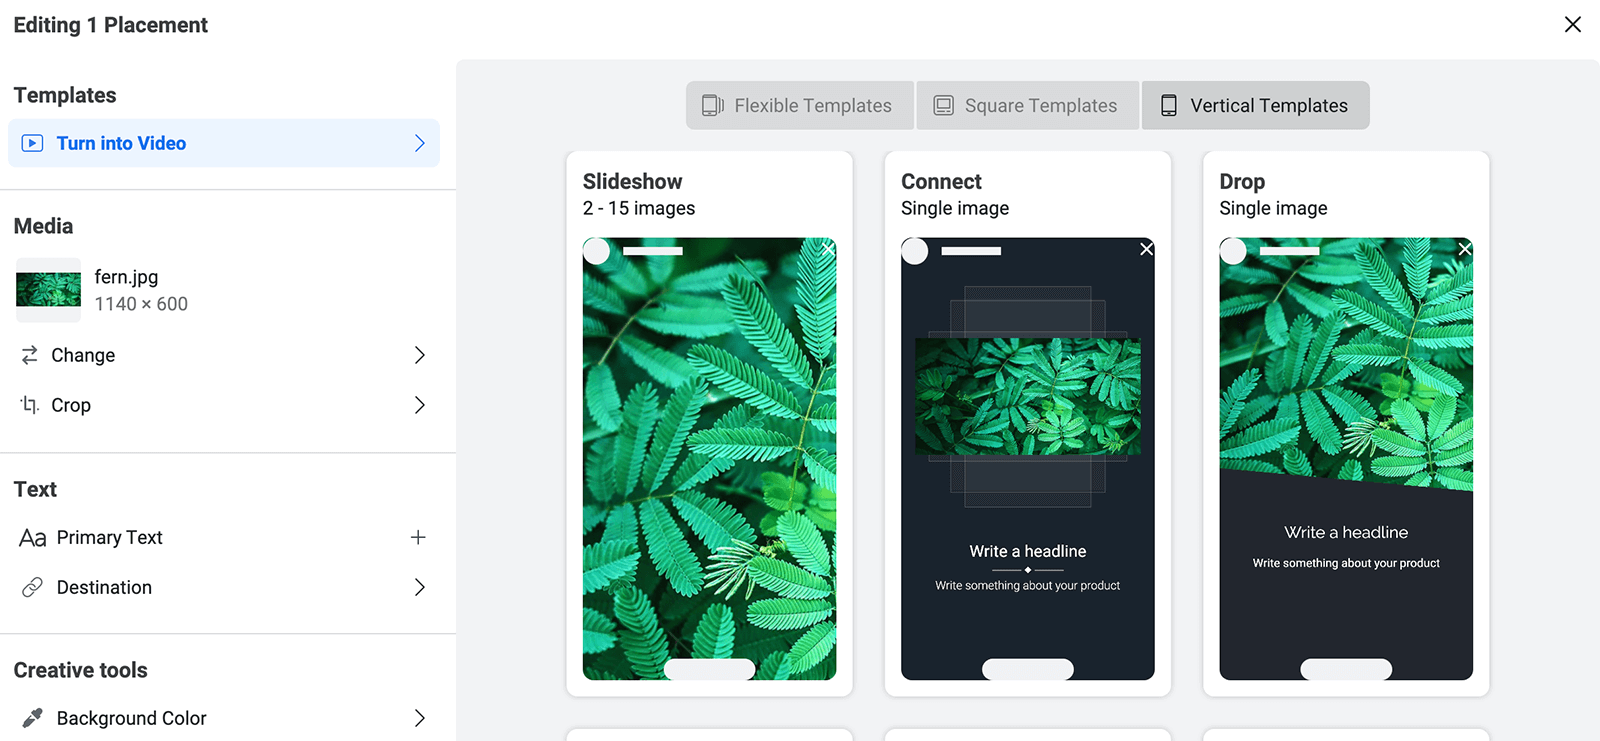
If you're concerned about how your ad will perform in newer placements like Reels and Stories, keep in mind you can adjust the creative for certain placements at the ad level. After uploading media, choose the placement you want to edit and click the pencil icon. Then change the media, add text, or use creative tools to optimize for the placement.
#8: Streamline the Learning Phase
One of the most effective ways to optimize ad delivery is to exit the learning phase as quickly as possible. During the learning phase, results and delivery are unpredictable and costs may be higher than you'd like. Once Ads Manager has optimized your campaign and your ad set has left the learning phase, results should improve as costs even out.
Tactics like broad targeting and maximizing ad placements can help your ad sets exit the learning phase efficiently. Scaling your ad sets gradually rather than increasing the spend exponentially can also help streamline the learning phase.
Meta now recommends another simple tactic for speeding up the learning phase: consolidating ad sets. In fact, if you're running several similar ad sets, Ads Manager may prompt you to combine them to improve delivery.
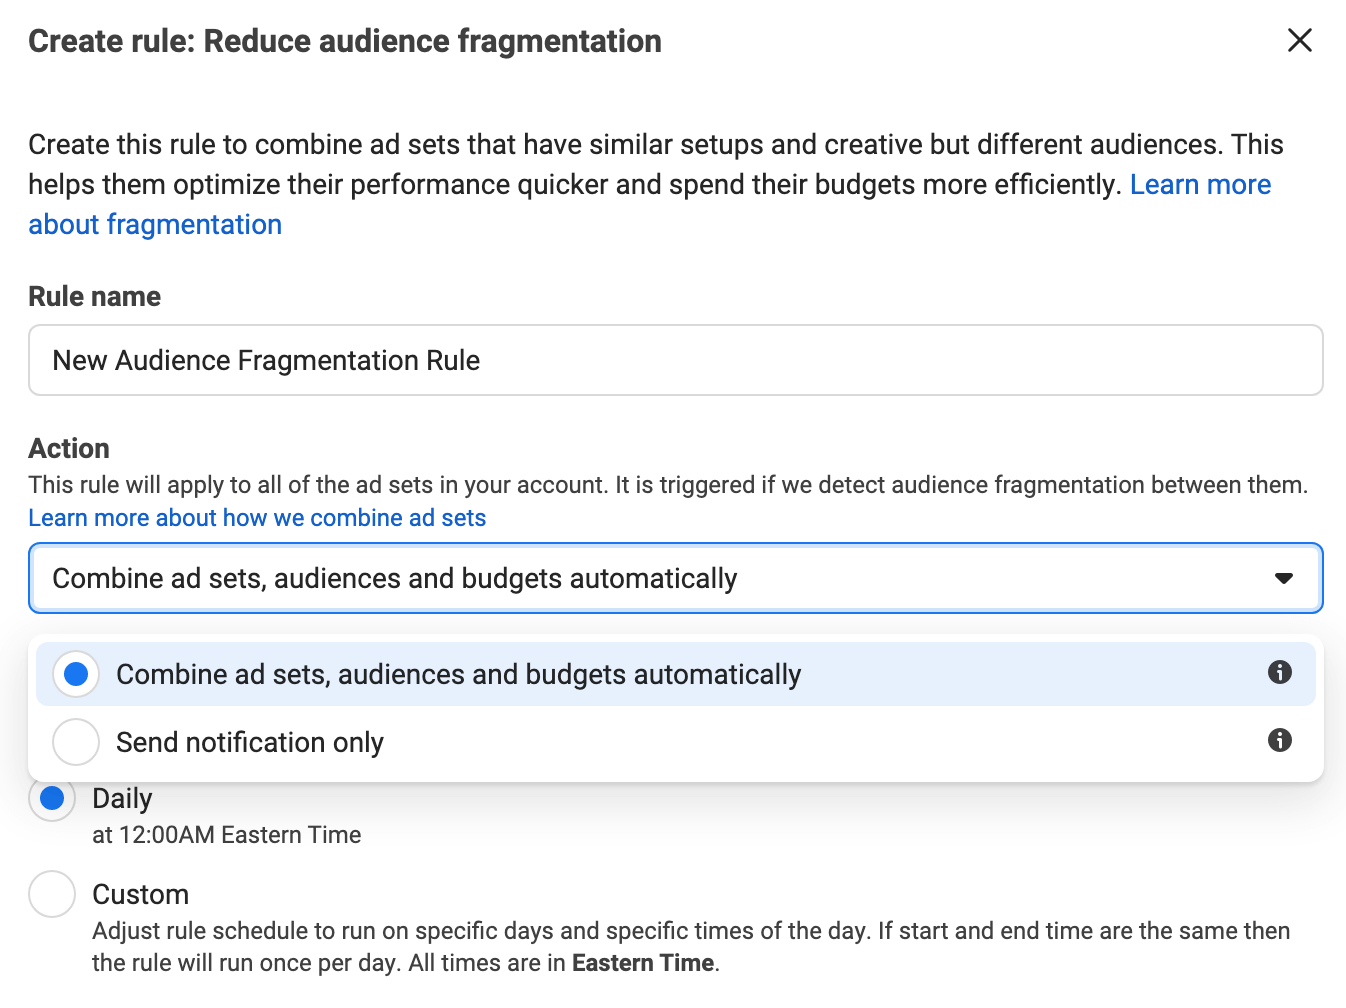
But you don't have to wait for an Ads Manager notification before taking action. Instead, you can set up automated rules that combine ad sets in certain situations. In Ads Manager, click Rules and select Create New Rule. Then select Reduce Audience Fragmentation.
If you don't want Ads Manager to adjust your ad sets automatically, you can set the rule to notify you when audience fragmentation is detected. If you'd rather let Ads Manager handle the process for you, select Combine Ad Sets, Audiences, and Budgets Automatically. You can set the rule to run daily or use custom intervals to apply the rule more or less often.
#9: Adopt Automation Options
Automated rules are far from the only automation option available in Ads Manager. To improve ad delivery automatically, you can also take advantage of Ads Manager's dynamic ads and experiences.
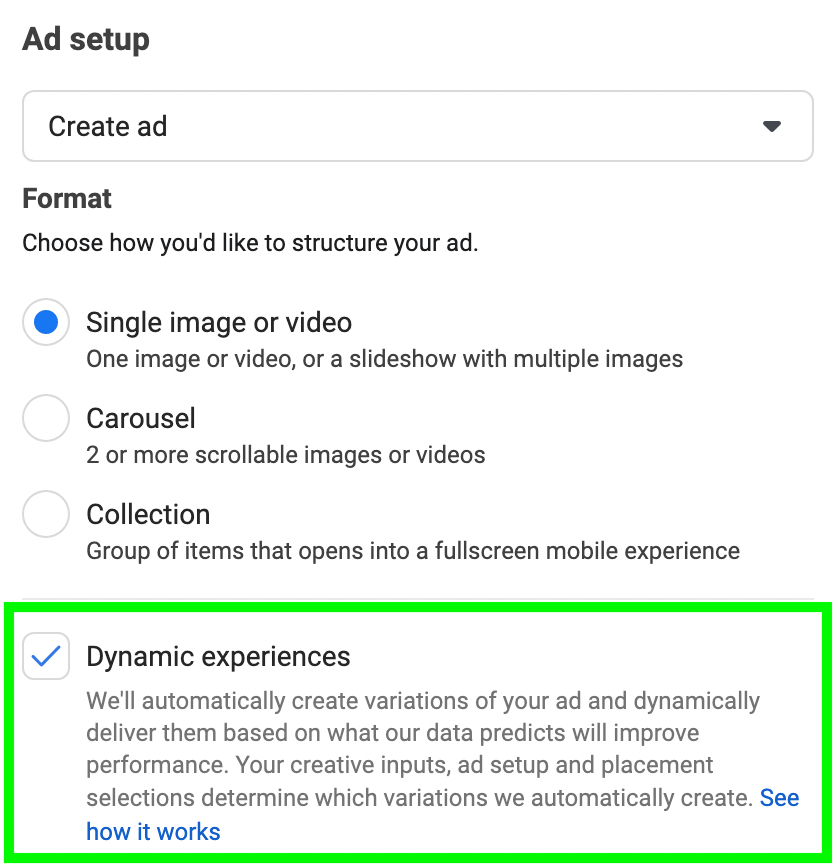
To leverage the latter, add a creative and multiple text options at the ad level. Then check the Dynamic Experiences box in the Ad Setup section. When you publish the ad, Meta automatically creates iterations that combine your text and creative while enhancing the media in various ways.
To use dynamic ads, create a campaign with the sales or app promotion objective. With the sales objective, link a catalog and switch on Dynamic Formats and Creative at the ad level to allow Meta to deliver the optimal ad to each person.
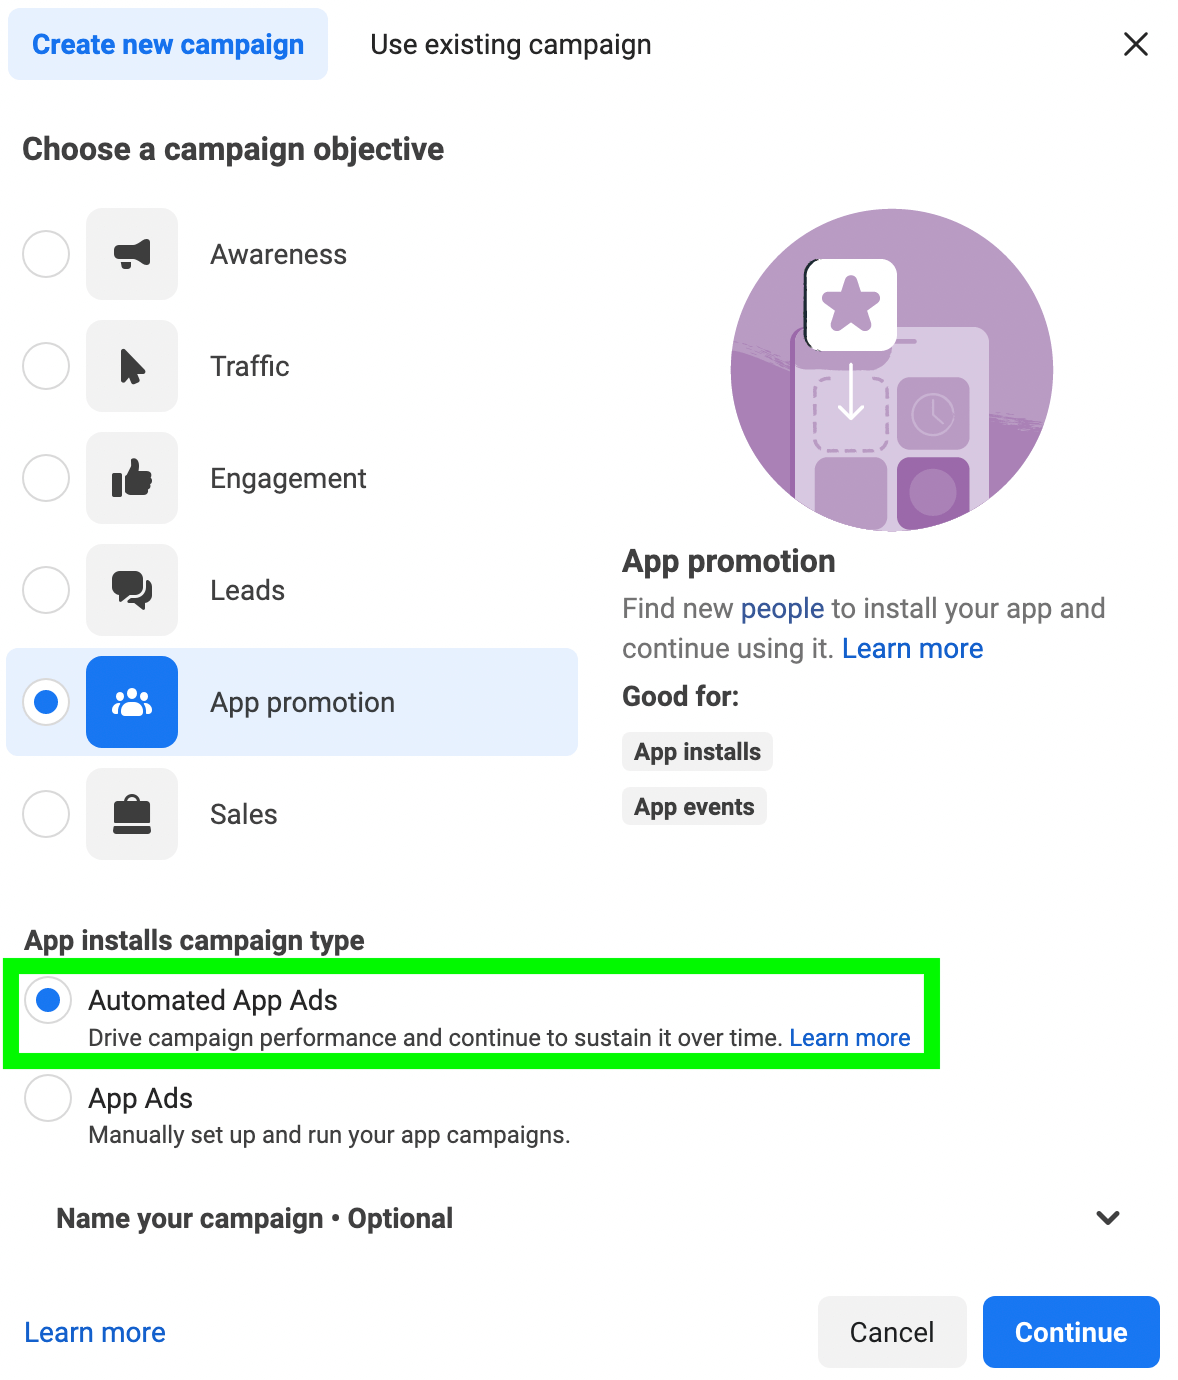
With the app promotion objective, select Automated App Ads at the campaign level. Then add up to 50 creatives and five headlines and primary text options so Meta can automatically generate the optimal combination of elements for each person.
#10: Use the Conversions API
If you're an experienced Facebook advertiser, then you've probably already set up the Meta pixel to attribute conversions and other activity on your website. However, Meta now recommends using the Conversions API and the Meta pixel simultaneously.
With both tools enabled, you can better understand how people engage with your business and allow Meta to optimize your ads more efficiently. The Conversions API can also help reduce over-reporting, which can improve accuracy and decrease costs.
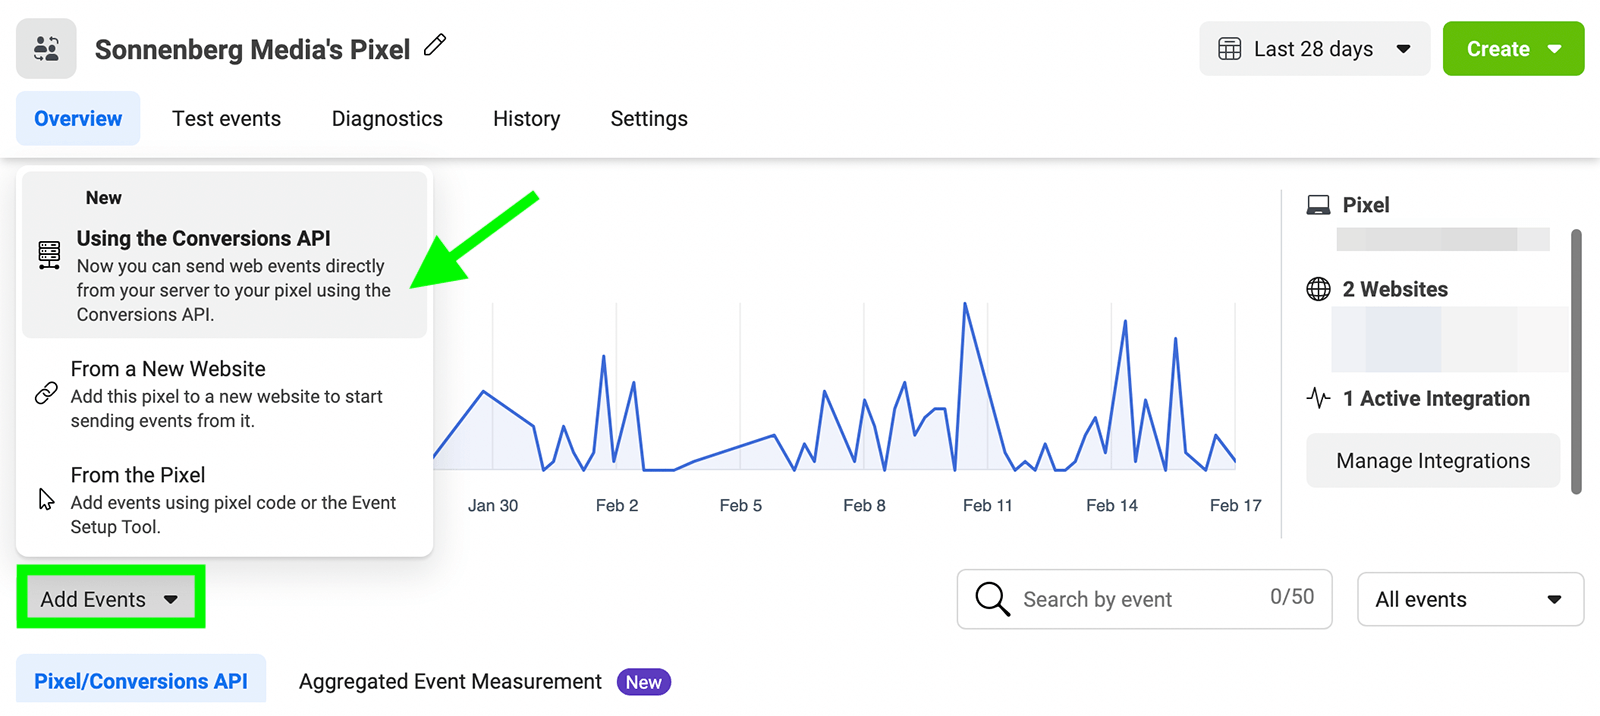
To set up the Conversions API, open Events Manager and locate your pixel. Click the Add Events button and select Using the Conversions API. You can set it up using partners like Shopify, WordPress, Zapier, or even Google Tag Manager. Follow the instructions to complete the integration with your platform of choice so you can start accessing more in-depth conversion insights.
#11: Account for Delayed Data
As you monitor Facebook ads performance, keep in mind that results don't necessarily appear in real time. Due to iOS-related tracking limitations, Ads Manager now reports aggregated and modeled results for conversion-optimized campaigns. Because modeling and aggregation take additional time, there's a 72-hour delay in reporting results.
Rather than analyzing campaigns in real time, wait at least 72 hours so you can access more accurate results. Then you can use Ads Manager reports and breakdowns to identify top-performing creatives and apply automated rules to begin scaling your most successful ad sets.
Conclusion
Facebook ads have changed dramatically in the last 12 months, largely due to Apple's App Tracking Transparency framework. Although these updates have permanently changed how Ads Manager works and how you can leverage social ads, following these best practices enables you to set up accurate reporting systems so you can continue to make progress toward your marketing goals.
Get More Advice on Facebook Ads
Want To Make Your Job Easier?
We've assembled a list of our favorite tools, solutions, and apps to help simplify and maximize nearly every area of your marketing. Whether you need help planning content, organizing your social posts, or developing a strategy…you'll find something for every situation.
FIND YOUR NEXT FAVE TOOL


0 Comments